

Post by ferrari512s on Jan 3, 2014 23:42:59 GMT -5
In Search of the Holy Grids
By Bob Rosas
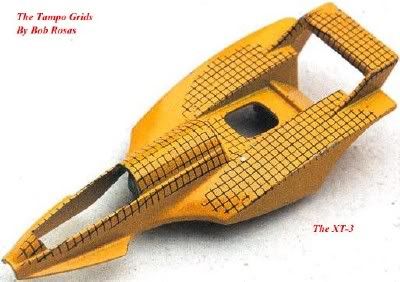
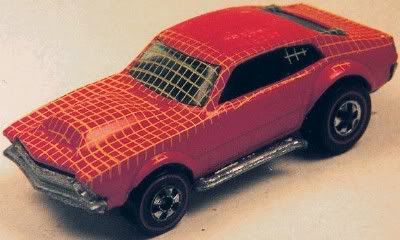
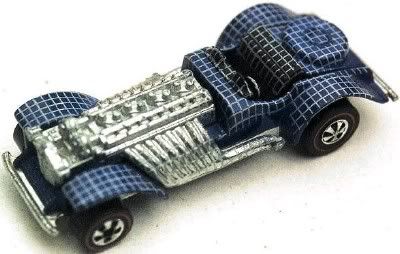
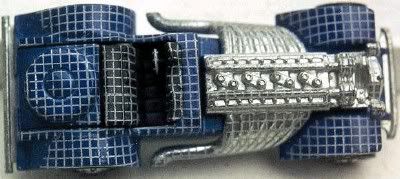
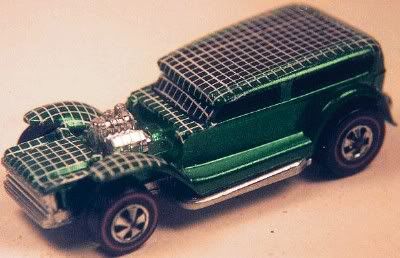
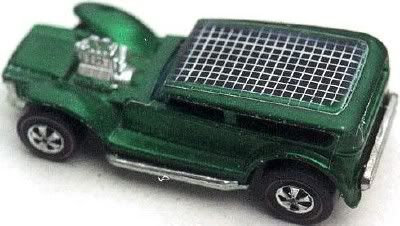
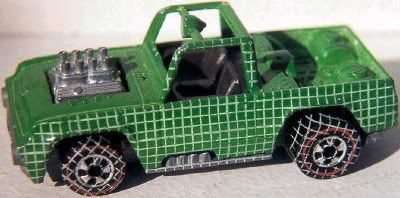
Once in a while a Hot Wheel car will show up at a Toy Car Show or on eBay™ sporting a grid of squares on them, looking like screen cloth from a window. How very peculiar indeed! But what do these grid lines signify? Well this is not an elaborate joke the designers and engineers played on each other nor is this decorative pattern something we did to pass the time. Others have suggested this was a prototype series of cars that Mattel never released. Well not quite, but very imaginative none the less. Lastly, these grids are not a maniacal game of checkers, Tic-Tac-Toe or X&O's. Nonetheless I found these theories rather amusing too. So what are the grids?
This grid is one of several necessary steps in the tampo process. It is used to determine the limits of the artwork and also takes into consideration the distortion adjustments that may be necessary due to the contours of the car. A car with a grid on it probably exists for every new car body ever made after 1973. Once we made a grid of a body we would save the grid for future print designs (re-tampo's) on that particular body.
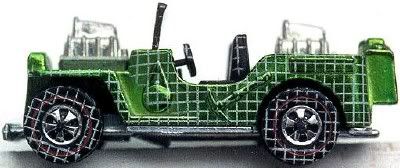
Tampo Grid Car II
In 1973, Mattel recognized that their costs saving efforts in changing the car colors to enamel instead of the multi-step spectraflame paints resulted in decreased popularity and sales of Hot Wheels®. But Mattel still had to reduce the costs and now needed to find a way to gain back the popularity they lost.
Tampo Grid Car III
They did some research and found a new way to decorating the cars. The result was to keep the enamel colors but add a new decorating process. The process had the ability to print up to three colors with rotary table pad printers. The equipment was developed by a German company and was already being used to decorate other products and objects that had contoured surfaces.
Tampo Grid Car IV
A new theme to introduce the printing process was selected for the blister cards called "Flying Colors". Along with it went a lot of new advertising and television commercials. We tried to limit the printed sides to three; most common were the sides and top/Hood/trunk. Some cars were difficult to print especially on a top where you had a step from the roof to the hood. A good example was on the 56 Hi-tail Hauler. We started printing this one on the hood and top but the printing pad kept getting cut by the big step so we just did the hood. Some cars gave us too much distortion from the hood to the trunk so we limited it to just the top and hood. The pad I spoke of earlier is made of a soft silicone and is typically shaped some what like the end of you elbow.
Tampo Grid Car V
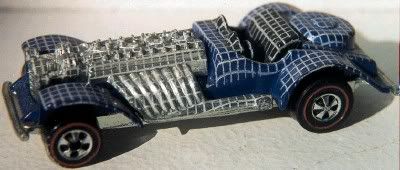
Step 1. Is to print a grid, which is a screen pattern of squares each square being 1/10 of an inch across. The printing of the grid comes from a photo-etched metal printing plate. Ink is applied to the plate and then the ink is squeegeed across the plate leaving ink in the etched design. The pad comes down and picks up the ink in the grid pattern and it adheres on to the pad surface. It is then transferred to the nested body of the car and grid on the pad is pressed on to the body of the car as you see in the photos. The worst distortion occurs as the pad wraps over the fenders, wheel wells or other major contours. Some areas will not print at all, refer to the photos.
Tampo Grid Car VI
Step 2. The grid goes to the designer. He then can see where he can put his graphics one the car. A Tampo "B" Sheet is made of the cars proposed graphics. Some times more than one "B" sheet is made. They are then shown to the marketing department for approval. In another article, I will elaborate on the Tampo "B" Sheets and show you some examples of some designs that made it and some that did not.
Tampo Grid Car VII
Step 3. The car body or in the case of a new car where the body is still being tooled, a product sized solid epoxy is then hand painted by an outside vendor. He will meticulously paint the chosen theme, for example flames and racing logos from the tampo "B" sheet. The hand painted car is shown again to marketing for approval and some times it is used in the television commercials or catalog photography.
In another future article, I will show you some pictures of hand painted cars along side the actual tampo printed cars. Most of the time you will have a difficult time telling which is the hand painted and which is the Tampo printed car.
Tampo Grid Car VIII

Step 4. The hand painted car is sent out to another vendor along with the grid print to make the final art 4 times larger than the actual design that is printed on the car. This artwork comes back in three layers or overlays, the lightest color, being the first to be printed. The reason for that is if you printed a white over a red the white would be somewhat transparent and look pink where it has been printed over the red ink. Now here is were the real usefulness of the distortion grid comes to play. It tells the artist were the art has to be distorted in the reverse direction of the distorted grids so that when it is printed it comes out looking straight or round or what ever the design was intended to look like.
Tampo Grid Car IX
Step 5. Were not finished yet, the designer checks the tampo artwork for accuracy and then it is sent to the photo department. The artwork is reduced again 4 times down or back to product size and set of negatives are made and touched up for each color to be printed. Then four sets of film positives are made.
Tampo Grid Car X

Step 6. The film positives are sent to equipment engineering where the tampo printing plates are made. The printing plates, one for each color for each side are made of special polished steel plate about 5 inches square. The plate is coated with photosensitive chemicals. The film positive is placed over the plate and it is exposed like film. After it is exposed the plate is washed in other chemicals which will etch the design into the plate about .005 to .008 inches deep
Tampo Grid Car XI
Step 7. The plates are put on a Tampo machine turntable where they are tested by printing on the painted car bodies or epoxies. If some thing does not look right in this step they go back and correct the artwork and make new film and new plates are retest again.
We are now ready to print on the production line. Whew! Not as easy as you thought, huh!
All pictures in this article are courtesy of Bob Rosas
By Bob Rosas
Once in a while a Hot Wheel car will show up at a Toy Car Show or on eBay™ sporting a grid of squares on them, looking like screen cloth from a window. How very peculiar indeed! But what do these grid lines signify? Well this is not an elaborate joke the designers and engineers played on each other nor is this decorative pattern something we did to pass the time. Others have suggested this was a prototype series of cars that Mattel never released. Well not quite, but very imaginative none the less. Lastly, these grids are not a maniacal game of checkers, Tic-Tac-Toe or X&O's. Nonetheless I found these theories rather amusing too. So what are the grids?
This grid is one of several necessary steps in the tampo process. It is used to determine the limits of the artwork and also takes into consideration the distortion adjustments that may be necessary due to the contours of the car. A car with a grid on it probably exists for every new car body ever made after 1973. Once we made a grid of a body we would save the grid for future print designs (re-tampo's) on that particular body.
Tampo Grid Car II
In 1973, Mattel recognized that their costs saving efforts in changing the car colors to enamel instead of the multi-step spectraflame paints resulted in decreased popularity and sales of Hot Wheels®. But Mattel still had to reduce the costs and now needed to find a way to gain back the popularity they lost.
Tampo Grid Car III
They did some research and found a new way to decorating the cars. The result was to keep the enamel colors but add a new decorating process. The process had the ability to print up to three colors with rotary table pad printers. The equipment was developed by a German company and was already being used to decorate other products and objects that had contoured surfaces.
Tampo Grid Car IV
A new theme to introduce the printing process was selected for the blister cards called "Flying Colors". Along with it went a lot of new advertising and television commercials. We tried to limit the printed sides to three; most common were the sides and top/Hood/trunk. Some cars were difficult to print especially on a top where you had a step from the roof to the hood. A good example was on the 56 Hi-tail Hauler. We started printing this one on the hood and top but the printing pad kept getting cut by the big step so we just did the hood. Some cars gave us too much distortion from the hood to the trunk so we limited it to just the top and hood. The pad I spoke of earlier is made of a soft silicone and is typically shaped some what like the end of you elbow.
Tampo Grid Car V
Step 1. Is to print a grid, which is a screen pattern of squares each square being 1/10 of an inch across. The printing of the grid comes from a photo-etched metal printing plate. Ink is applied to the plate and then the ink is squeegeed across the plate leaving ink in the etched design. The pad comes down and picks up the ink in the grid pattern and it adheres on to the pad surface. It is then transferred to the nested body of the car and grid on the pad is pressed on to the body of the car as you see in the photos. The worst distortion occurs as the pad wraps over the fenders, wheel wells or other major contours. Some areas will not print at all, refer to the photos.
Tampo Grid Car VI
Step 2. The grid goes to the designer. He then can see where he can put his graphics one the car. A Tampo "B" Sheet is made of the cars proposed graphics. Some times more than one "B" sheet is made. They are then shown to the marketing department for approval. In another article, I will elaborate on the Tampo "B" Sheets and show you some examples of some designs that made it and some that did not.
Tampo Grid Car VII
Step 3. The car body or in the case of a new car where the body is still being tooled, a product sized solid epoxy is then hand painted by an outside vendor. He will meticulously paint the chosen theme, for example flames and racing logos from the tampo "B" sheet. The hand painted car is shown again to marketing for approval and some times it is used in the television commercials or catalog photography.
In another future article, I will show you some pictures of hand painted cars along side the actual tampo printed cars. Most of the time you will have a difficult time telling which is the hand painted and which is the Tampo printed car.
Tampo Grid Car VIII
Step 4. The hand painted car is sent out to another vendor along with the grid print to make the final art 4 times larger than the actual design that is printed on the car. This artwork comes back in three layers or overlays, the lightest color, being the first to be printed. The reason for that is if you printed a white over a red the white would be somewhat transparent and look pink where it has been printed over the red ink. Now here is were the real usefulness of the distortion grid comes to play. It tells the artist were the art has to be distorted in the reverse direction of the distorted grids so that when it is printed it comes out looking straight or round or what ever the design was intended to look like.
Tampo Grid Car IX
Step 5. Were not finished yet, the designer checks the tampo artwork for accuracy and then it is sent to the photo department. The artwork is reduced again 4 times down or back to product size and set of negatives are made and touched up for each color to be printed. Then four sets of film positives are made.
Tampo Grid Car X
Step 6. The film positives are sent to equipment engineering where the tampo printing plates are made. The printing plates, one for each color for each side are made of special polished steel plate about 5 inches square. The plate is coated with photosensitive chemicals. The film positive is placed over the plate and it is exposed like film. After it is exposed the plate is washed in other chemicals which will etch the design into the plate about .005 to .008 inches deep
Tampo Grid Car XI
Step 7. The plates are put on a Tampo machine turntable where they are tested by printing on the painted car bodies or epoxies. If some thing does not look right in this step they go back and correct the artwork and make new film and new plates are retest again.
We are now ready to print on the production line. Whew! Not as easy as you thought, huh!
All pictures in this article are courtesy of Bob Rosas